Zafascynowany prostotą integracji licznika energii Eastron SDM630 przez protokół Modbus po RS-485 podjąłem się podłączenia falownika Growatt 10KTL3-X do mojego Home Assistanta. Łatwo nie było więc aby nie przedłużać, zamieszczę tutaj same konkretne i przydatne informacje.
Poznaj podstawy
Dość proste zagadnienia do ogarnięcia to:
- Podstawy sieci RS-485: https://ntronic.pl/rs-485/
- Co to jest i jak działa Modbus: https://ntronic.pl/jak-dziala-modbus/
Jeżeli w logach napotkasz problemy dotyczące Modbusa to ważne jest abyś ze zrozumieniem przeczytał w/w przeze mnie artykuł o tym czym jest i jak działa ten protokół.
Jak stworzyć sieć RS-485?
Topologia jest banalnie prosta. Do jej wykonania potrzebujesz:
- konwerter USB to RS-485 oparty o FT232 (koszt ok 55 zł)
- skrętka – kabel sieciowy drut UTP cat. 5e (0,50 zł – 1,50 zł / metr)
I tak na prawdę nic więcej 🙂 Ew opornik 120R z dokładnością 1% (koszt 2,50 zł / 25 sztuk) ale bez niego sieć powinna działać bez problemu. U mnie odległość między serwerem a ostatnim urządzeniem to ok 25 metrów kabla.
Z kabla sieciowego będziesz potrzebował 2 par przewodów. Ja wziąłem kabelki pomarańczowy i pomarańczowo-biały oraz brązowy i brązowo-biały. Jakie Ty u siebie wybierzesz kolory to nie ma żadnego znaczenia. Ważne jest aby była to skręcona para.
W konwerterze USB-RS485 są zaciski, kabelki mam podpięte w następujący sposób:
Pomarańczowo-biały mam wpięty w zaciski „A”
Pomarańczowy w zacisk „B”
Brązowa para jest skręcona i wpięta w „GND” (uziemienie).
Skrętka idzie przez dom aż do garażu. Tam „dokręcam” do niej dwie kolejne skrętki. Jedna idzie do licznika Eastron SDM630 a druga do inwertera Growatt MOD 10KTL3-X. Biorę po prostu 3 pomarańczowe druciki i je skręcam. Tak samo robię z pozostałymi. Dbam o to by skręcone pary przewodów były blisko siebie (pomarańczowy i pomarańczowo-biały cały czas się przytulają).
Falowniki serii MOD są wyposażone w 16-stykowe złącze sygnałowe, z wyjątkiem modeli wietnamskich.
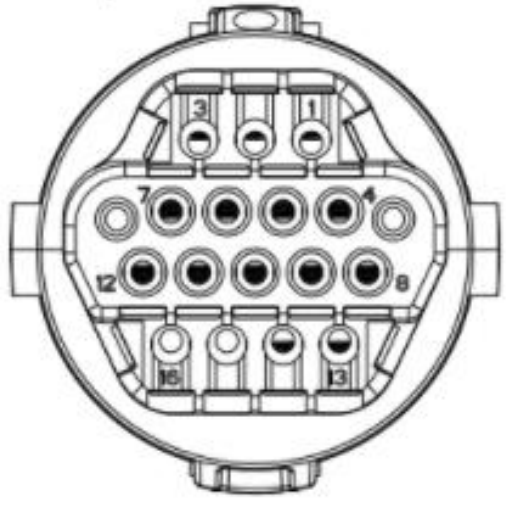
Zgodnie ze schematem na stronie 36 instrukcji, biorę kabelek „A” (pomarańczowo-biały) i zaciskam go w porcie numer „3”. Kabelek pomarańczowy czyli „B” zaciskam w porcie numer „4”. Pary brązowej nie podłączam.
Integracja: Home Assistant + Modbus
Uwaga:
W jednej z najnowszych wersji Home Assistanta (2023-10), zmienna count (liczba rejestrów do odczytania), może być używana tylko i wyłącznie z data_type: custom oraz data_type: string. Dla pozostałych typów danych, zmienna ta obliczana jest automatycznie.
Jeżeli po aktualizacji nie działa Tobie Modbus to sprawdź logi i zrób porządek z ustawieniami.
Konfiguracja Modbus w Home Assistant
Najpierw musisz zainicjować komunikację Modbus po RS-485.
Wchodzimy w plik configuration.yaml a następnie dodajemy taki oto kod:
modbus:
- name: rs485_rtu
  type: serial
  method: rtu
  port: /dev/ttyUSB1
  baudrate: 9600
  bytesize: 8
  parity: N
  stopbits: 1
  sensors: !include modbus_sensor.yaml
Wszystkie parametry musisz dostosować pod siebie.
Name – tu możesz wpisać dowolną nazwę
Port – podajesz port pod którym masz konwerter.
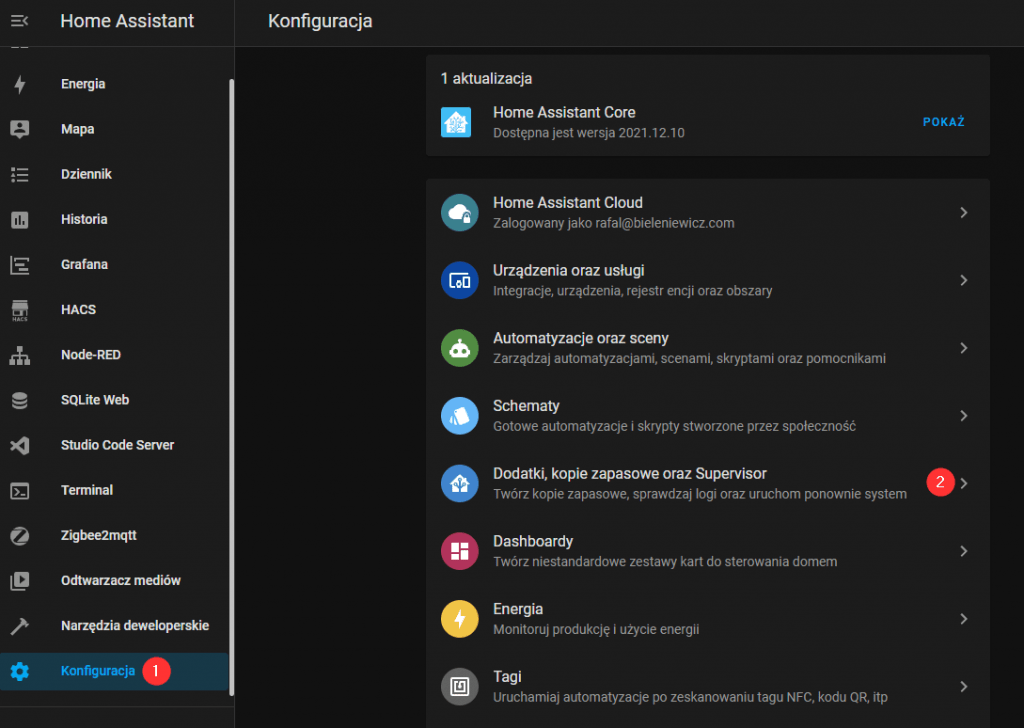
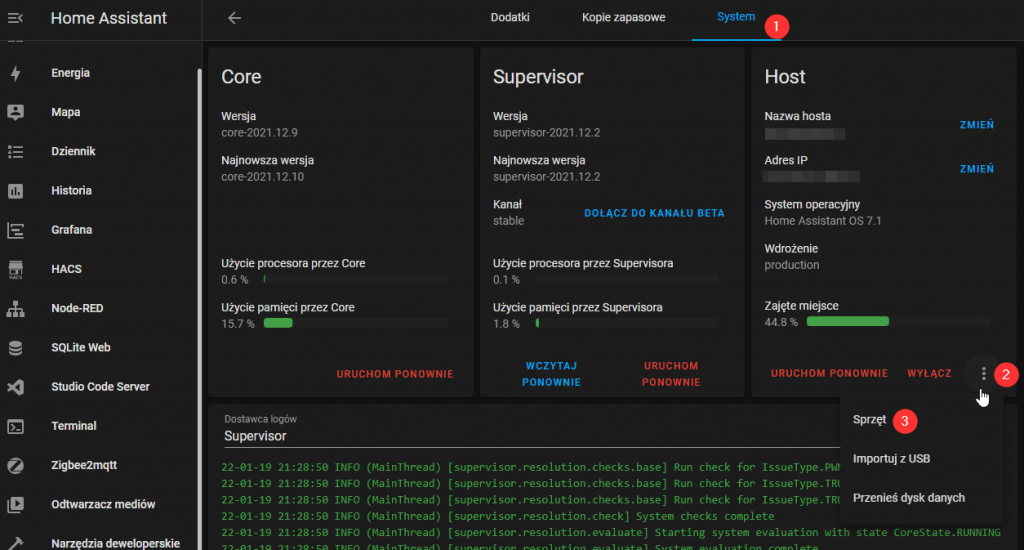
Po wpięciu konwertera wejdź w menu Konfiguracja / Dodatki, kopie zapasowe oraz Supervisor / Zakładka „System”
W obszarze „Host” w prawym dolnym rogu masz 3 kropkowe menu, z niego wybierasz „Sprzęt”.
W oknie które się pojawi wpisz „ttyUSB”.
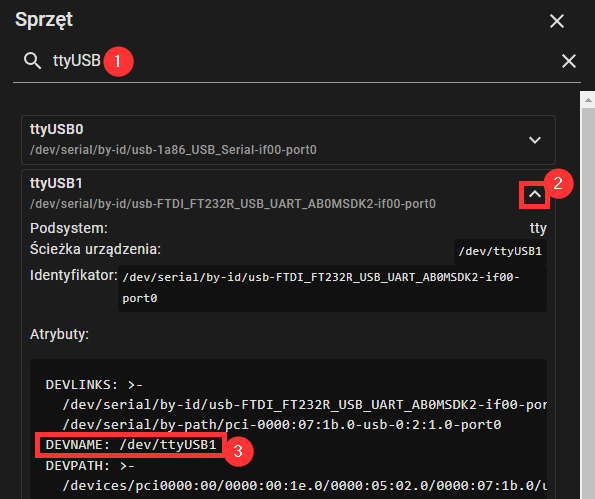
DEVNAME to nazwa portu który należy wpisać w pliku konfiguracyjnym.
Falownik Growatta domyślnie chodzi na ustawieniach 9600 8 N 1 więc zostawiasz tak jak jest. Jak wiesz z artykułów każde urządzenie typu „Slave” ma swój adres. Inwerter ma numer „001”. W konfiguracji o której przeczytasz poniżej nie w adresie slave będziesz wpisywał „1” bez zer na początku.
Encje / sensory falownika Growatt MOD 10KTL3-X
Zauważ, że na końcu w/w kodu dodałem sensors: !include modbus_sensor.yaml
Ponieważ lista sensorów jest dość długa, utworzyłem oddzielny plik i za pomocą !include dołączam go do pliku konfiguracyjnego.
Mapę rejestrów „Holding Register” oraz „Input Register” znajdziesz w tym pliku: Growatt Inverter Modbus RTU Protocol
Oto gotowy kod który możesz wkleić do pliku modbus_sensor.yaml:
- name: G10KTL3X Inverter status
  slave: 1
  address: 0
  input_type: input
  # count: 1
  data_type: uint16
  precision: 0
  scale: 1
  scan_interval: 5

- name: G10KTL3X Input power H
  unit_of_measurement: W
  slave: 1
  address: 1
  input_type: input
  count: 1
  data_type: uint16
  precision: 1
  scale: 0.1
  scan_interval: 5
  device_class: power

- name: G10KTL3X Input power L
  unit_of_measurement: W
  slave: 1
  address: 2
  input_type: input
  count: 1
  data_type: uint16
  precision: 1
  scale: 0.1
  scan_interval: 5
  device_class: power

- name: G10KTL3X PV1 voltage
  unit_of_measurement: V
  slave: 1
  address: 3
  input_type: input
  count: 1
  data_type: uint16
  precision: 1
  scale: 0.1
  scan_interval: 5
  device_class: voltage

- name: G10KTL3X PV1 input current
  unit_of_measurement: A
  slave: 1
  address: 4
  input_type: input
  count: 1
  data_type: uint16
  precision: 1
  scale: 0.1
  scan_interval: 5
  device_class: current

- name: G10KTL3X PV1 input power H
  unit_of_measurement: W
  slave: 1
  address: 5
  input_type: input
  count: 1
  data_type: uint16
  precision: 1
  scale: 0.1
  scan_interval: 5
  device_class: power

- name: G10KTL3X PV1 input power L
  unit_of_measurement: W
  slave: 1
  address: 6
  input_type: input
  count: 1
  data_type: uint16
  precision: 1
  scale: 0.1
  scan_interval: 5
  device_class: power

- name: G10KTL3X PV2 voltage
  unit_of_measurement: V
  slave: 1
  address: 7
  input_type: input
  count: 1
  data_type: uint16
  precision: 1
  scale: 0.1
  scan_interval: 5
  device_class: voltage


- name: G10KTL3X PV2 input current
  unit_of_measurement: A
  slave: 1
  address: 8
  input_type: input
  count: 1
  data_type: uint16
  precision: 1
  scale: 0.1
  scan_interval: 5
  device_class: current

- name: G10KTL3X PV2 input power H
  unit_of_measurement: W
  slave: 1
  address: 9
  input_type: input
  count: 1
  data_type: uint16
  precision: 1
  scale: 0.1
  scan_interval: 5
  device_class: power

- name: G10KTL3X PV2 input power L
  unit_of_measurement: W
  slave: 1
  address: 10
  input_type: input
  count: 1
  data_type: uint16
  precision: 1
  scale: 0.1
  scan_interval: 5
  device_class: power

#Pac H
- name: G10KTL3X Output power H
  unit_of_measurement: W
  slave: 1
  address: 35
  input_type: input
  count: 1
  data_type: uint16
  precision: 1
  scale: 0.1
  scan_interval: 5
  device_class: power

#Pac L
- name: G10KTL3X Output power L
  unit_of_measurement: W
  slave: 1
  address: 36
  input_type: input
  count: 1
  data_type: uint16
  precision: 1
  scale: 0.1
  scan_interval: 5
  device_class: power


#Fac - Grid frequency
- name: G10KTL3X Grid frequency
  unit_of_measurement: Hz
  slave: 1
  address: 37
  input_type: input
  count: 1
  data_type: uint16
  precision: 2
  scale: 0.01
  scan_interval: 25
  device_class: frequency

# Three phase grid voltage 0.1V Line voltage
- name: G10KTL3X Vac RS
  unit_of_measurement: V
  slave: 1
  address: 50
  input_type: input
  count: 1
  data_type: uint16
  precision: 1
  scale: 0.1
  scan_interval: 15
  device_class: voltage

# Three phase grid voltage 0.1V Line voltage
- name: G10KTL3X Vac ST
  unit_of_measurement: V
  slave: 1
  address: 51
  input_type: input
  count: 1
  data_type: uint16
  precision: 1
  scale: 0.1
  scan_interval: 5
  device_class: voltage


# Three phase grid voltage 0.1V Line voltage
- name: G10KTL3X Vac TR
  unit_of_measurement: V
  slave: 1
  address: 52
  input_type: input
  count: 1
  data_type: uint16
  precision: 1
  scale: 0.1
  scan_interval: 15
  device_class: voltage


# Today generate energy (high) 0.1 kWh - 53
- name: G10KTL3X Today generate energy H
  unit_of_measurement: kWh
  slave: 1
  address: 53
  input_type: input
  count: 1
  data_type: uint16
  precision: 1
  scale: 0.1
  scan_interval: 15
  device_class: energy

# Today generate energy (low) 0.1 kWh - 54
- name: G10KTL3X Today generate energy L
  unit_of_measurement: kWh
  slave: 1
  address: 54
  input_type: input
  count: 1
  data_type: uint16
  precision: 1
  scale: 0.1
  scan_interval: 15
  device_class: energy

# Total generate energy (high) 0.1 kWh - 55 - Eac total H
- name: G10KTL3X Total generate energy H
  unit_of_measurement: kWh
  slave: 1
  address: 55
  input_type: input
  count: 1
  data_type: uint16
  precision: 1
  scale: 0.1
  scan_interval: 15
  device_class: energy

# Total generate energy (high) 0.1 kWh - 56 - Eac total L
- name: G10KTL3X Total generate energy L
  unit_of_measurement: kWh
  slave: 1
  address: 56
  input_type: input
  count: 1
  data_type: uint16
  precision: 1
  scale: 0.1
  scan_interval: 15
  device_class: energy

- name: G10KTL3X Work time total H
  unit_of_measurement: s
  slave: 1
  address: 57
  input_type: input
  count: 1
  data_type: uint16
  scan_interval: 60

- name: G10KTL3X Work time total L
  unit_of_measurement: s
  slave: 1
  address: 58
  input_type: input
  count: 1
  data_type: uint16
  scan_interval: 60

# PV1 Energy today (high)
- name: G10KTL3X PV1 Energy today H
  unit_of_measurement: kWh
  slave: 1
  address: 59
  input_type: input
  count: 1
  data_type: uint16
  precision: 1
  scale: 0.1
  scan_interval: 60
  device_class: energy

# PV1 Energy today (low)
- name: G10KTL3X PV1 Energy today L
  unit_of_measurement: kWh
  slave: 1
  address: 60
  input_type: input
  count: 1
  data_type: uint16
  precision: 1
  scale: 0.1
  scan_interval: 60
  device_class: energy

# PV1 Energy total (high)
- name: G10KTL3X PV1 Energy total H
  unit_of_measurement: kWh
  slave: 1
  address: 61
  input_type: input
  count: 1
  data_type: uint16
  precision: 1
  scale: 0.1
  scan_interval: 60
  device_class: energy

# PV1 Energy total (low)
- name: G10KTL3X PV1 Energy total L
  unit_of_measurement: kWh
  slave: 1
  address: 62
  input_type: input
  count: 1
  data_type: uint16
  precision: 1
  scale: 0.1
  scan_interval: 60
  device_class: energy


# PV2 Energy today (high)
- name: G10KTL3X PV2 Energy today H
  unit_of_measurement: kWh
  slave: 1
  address: 63
  input_type: input
  count: 1
  data_type: uint16
  precision: 1
  scale: 0.1
  scan_interval: 60
  device_class: energy

# PV2 Energy today (low)
- name: G10KTL3X PV2 Energy today L
  unit_of_measurement: kWh
  slave: 1
  address: 64
  input_type: input
  count: 1
  data_type: uint16
  precision: 1
  scale: 0.1
  scan_interval: 60
  device_class: energy

# PV2 Energy total (high)
- name: G10KTL3X PV2 Energy total H
  unit_of_measurement: kWh
  slave: 1
  address: 65
  input_type: input
  count: 1
  data_type: uint16
  precision: 1
  scale: 0.1
  scan_interval: 60
  device_class: energy

# PV2 Energy total (low)
- name: G10KTL3X PV2 Energy total L
  unit_of_measurement: kWh
  slave: 1
  address: 66
  input_type: input
  count: 1
  data_type: uint16
  precision: 1
  scale: 0.1
  scan_interval: 60
  device_class: energy

# PV Energy total (high)
- name: G10KTL3X PV Energy total H
  unit_of_measurement: kWh
  slave: 1
  address: 91
  input_type: input
  count: 1
  data_type: uint16
  precision: 1
  scale: 0.1
  scan_interval: 60
  device_class: energy

# PV Energy total (low)
- name: G10KTL3X PV Energy total L
  unit_of_measurement: kWh
  slave: 1
  address: 92
  input_type: input
  count: 1
  data_type: uint16
  precision: 1
  scale: 0.1
  scan_interval: 60
  device_class: energy
Za jakiś czas uzupełnię artykuł o zdjęcia oraz objaśnię za co odpowiadają wpisy w tym kodzie.
Problem „data_type” oraz „count”
BTW jeżeli zmienisz data_type na custom oraz dasz structure to również będziesz mógł odczytać dane z falownika.
  data_type: custom
  structure: ">1H"
Więcej na ten temat oraz jeżeli chcesz poczytać o problemach jakie spotkałem po drodze możesz sprawdzić wątek na forum ArturHome: https://forum.arturhome.pl/t/rs485-energia-growatt-eastron-sdm630-modbus-v2/ Jeżeli w logach masz nietypowe zapisy to być może ten wątek naprowadzi Ciebie na rozwiązanie problemu.